Indigo Dyeing at Clair’s House
Friday, November 23
You will experience the miracle of indigo dyeing in a vat--your fabric gets dipped into the dye, comes out pea green, and slowly turns indigo blue as the air hits it.
This session will be an introduction to the process. My current dye vat can probably handle a total of three more pounds of material. Once you see how it’s done you can make your own vat at home and dye up to five pounds of your own fabric or yarn.
Please bring a small piece of cotton, silk, or wool cloth OR a small skein of wool or cotton yarn. Wash the fabric or yarn, using Synthrapol fabric detergent or good old blue Dawn dishwashing detergent. Rinse well. You can bring your project dry or damp.
Sample technique using marbles, rubber bands, and stitching
We will further prepare the cloth here.I will show you some of the shibori (Japanese manual resist dyeing) techniques I have learned so far. Here is a good tutorial if you’d like an intro to shibori: https://www.seamwork.com/issues/2015/08/shibori-dyeing
 |
| I use small blocks like these for clamping |
I have some rubber bands, some marbles, and a few small wood blocks for clamping that I can share. I also have lots of vinyl gloves for everyone. You can bring more rubber bands, clamps or clothes pins, small pieces of wood (see above photo) and some strong cotton string or twine if you have some on hand.
A short piece of PVC pipe (or even an empty wine bottle) can be used for bomaki shibori (pole wrapping). You can see what that looks like here: https://cynthia-reynolds.com/2010/04/29/bomaki-shibori-tutorial/.
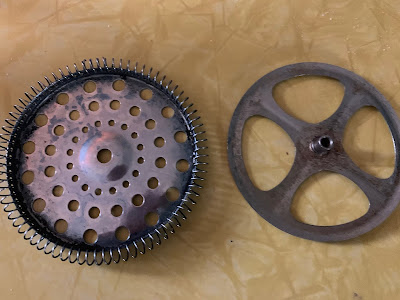
Get creative: I use these coffee pot parts for making designs on the clamped cloth. Just remember that any tools you use will have to be dedicated to dyeing from now on and can no longer be used for food preparation.
We will do the dyeing in my kitchen sink. You can wear old clothes if you are worried about getting the dye on you. I’ve had pretty good luck so far, having only dyed one of my hands when the glove leaked. I'll do the messy part--the dipping--to be sure that no air gets introduced into the dyebath. I've been practicing.
My first indigo projects
We will soak your cloth/yarn in water before dipping it in the vat. After dyeing, it will hang outside to drip dry. Please bring a plastic bag to carry your damp project home. You will be able to complete the rinsing and washing steps there.
When you get your project home: Let it air for 24 hours then wash until no more blue comes off. Rinse well, then neutralize by soaking in a vinegar bath (1 tablespoon vinegar per quart of water) for at least 10 minutes, then rinse well. See https://blog.ellistextiles.com/2017/05/06/how-to-finish-indigo-and-a-natural-dye-book-in-the-works/
When you get your project home: Let it air for 24 hours then wash until no more blue comes off. Rinse well, then neutralize by soaking in a vinegar bath (1 tablespoon vinegar per quart of water) for at least 10 minutes, then rinse well. See https://blog.ellistextiles.com/2017/05/06/how-to-finish-indigo-and-a-natural-dye-book-in-the-works/
I've given you a lot of information here, but it's just the beginning. It'll be fun. It's grown-up tie-dyeing!


No comments:
Post a Comment